ContactCS User Guide
ContactCS is a desktop application designed for NUS Computer Science freshmen to help them efficiently manage and locate essential contact details. The app is designed to store and organize contacts for key individuals relevant to their academic journey, including:
- Professors and teaching assistants for enrolled modules
- Classmates for collaborative projects and study groups
- School offices for administrative matters
- Emergency contacts for urgent situations
- and more!
Callouts Convention
The callout boxes below are used in documentation to enhance readability and provide important contextual information.
Info Box: Provides additional information or context.
Tip Box: Offers helpful tips or suggestions.
Caution Box: Alerts you to potential issues or problems that may arise.
Quick start
Ensure that Java 17 is installed on your computer.
- Open a command terminal.
- Type the following command to check the Java version:
java -version - If Java 17 is installed, you should see an output similar to:
java version "17.0.1" - If you do not have Java 17, you can download it from Oracle's official website.
Download the application
- Get the latest
.jarfile from here.
- Get the latest
Set up the home folder
- Choose a folder where you want to store your ContactCS data.
- Copy the downloaded
.jarfile to this folder. - This folder will serve as the "home folder" for your ContactCS.
Run the application
- Open a command terminal.
- Navigate (
cd) to the folder where you placed the.jarfile.For Windows users, type:
cd \path\to\your\folderCaution: Replace path\to\your\folder with the actual path. e.g.
cd C:\Documents\ContactCSTo find the actual path to your folder:
Press the Windows key + S to open the search bar, type in the name of the file, and right-click the file that appears. Click on copy path.
For Mac users, type:
cd /path/to/your/folderCaution: Replace path/to/your/folder with the actual path. e.g.
cd ~/Documents/ContactCSTo find the actual path to your folder:
- Navigate to the file in the Finder and select it.
- Right-click or Control-click on it and choose Get Info.
- In the window that opens, look at the Where field.
- Copy the path from the Where field.
- Run the application with the following command:
java -jar contactcs.jar
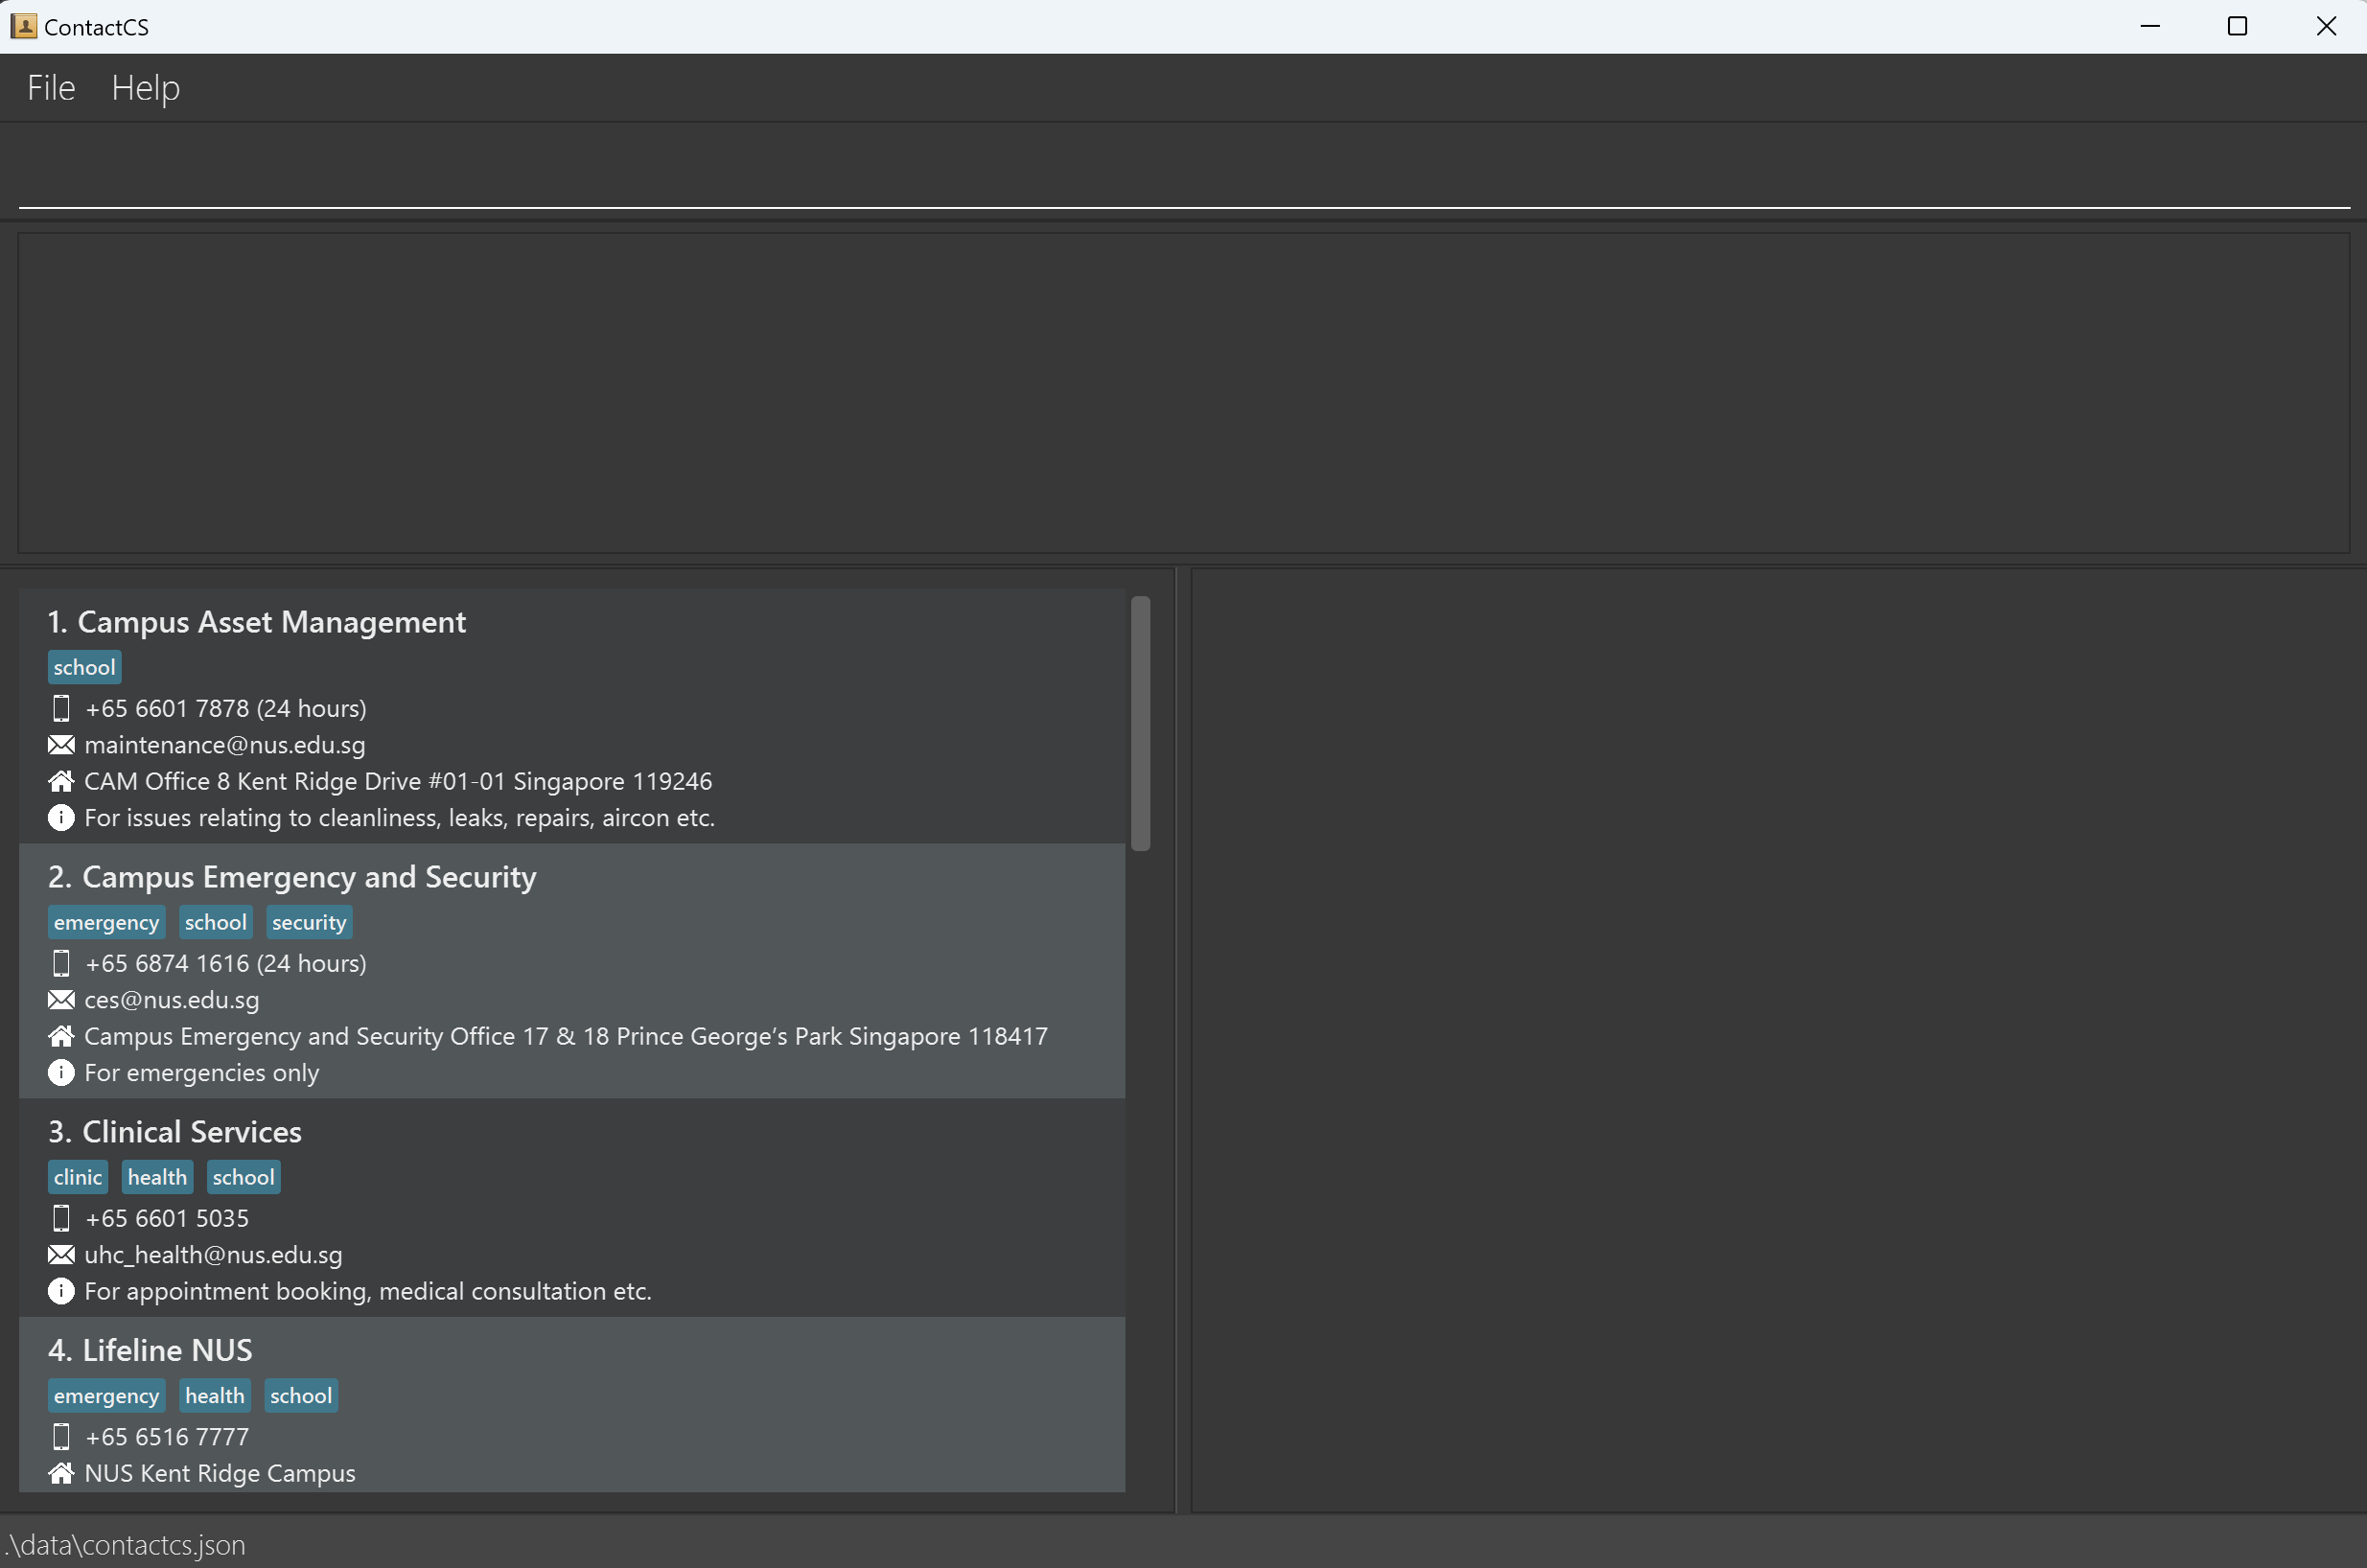
A GUI similar to the screenshot below should appear in a few seconds. Note how the app contains some sample data.
Type the command in the command box and press Enter to execute it. e.g. typing
helpand pressing Enter will open the help window.
Some example commands you can try:list: Lists all contacts.add n/John Doe p/98765432 e/johnd@example.com r/CS1101S: Adds a contact namedJohn Doewho takes CS1101S to the Address Book.delete 3: Deletes the 3rd contact shown in the current list.clear: Deletes all contacts.exit: Exits the app.
Refer to the Features below for details of each command.
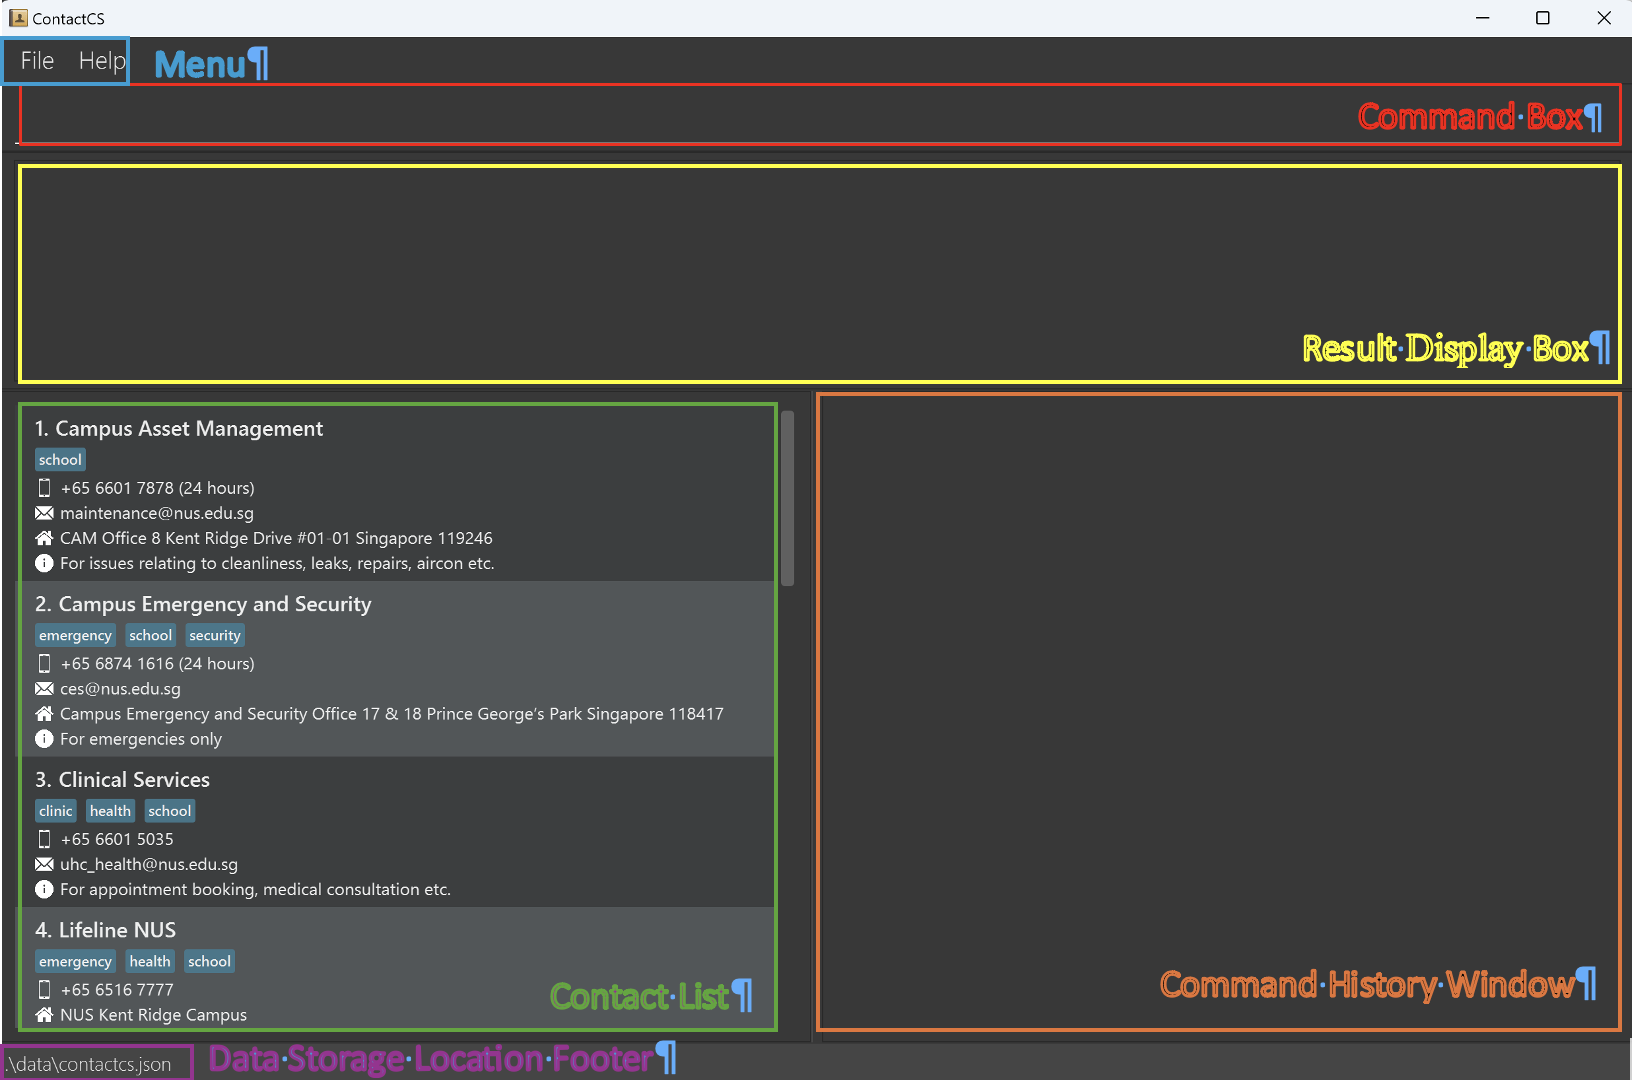
Overview of GUI
Once ContactCS is running, you’ll see the main interface divided into several key panels, as illustrated below. Here’s an overview of each panel:
Command Box: You can type and execute commands here .
Result Display Box: Shows the outcome of the commands you enter, including success messages, errors, and other feedback.
Contact List: Displays the list of contacts, allowing easy access to contact information.
Command History Window: Contains a history of commands that modify the contact list, enabling you to quickly refer to recent modifications.
Menu (File/Help): Provides options such as exiting the application and accessing help documentation.
Data Storage Location Footer: Shows the directory where the contact data are saved, providing quick access to storage information.
Info: Notes about the command history
The Command History Window only displays commands that directly modify the contact list, including:
add- Adds a new contact.edit- Edits details of an existing contact.delete- Removes specified contacts.clear- Clears all contacts from the list.
Commands that do not alter the contact data, such as list, find, help, and exit, are not shown in the command history window.
This helps keep the command history focused on actions that impact the contact list.
Info: Notes about the command format
Words in
UPPER_CASEare the parameters to be supplied by the user.
e.g. inadd n/NAME,NAMEis a parameter which can be used asadd n/John Doe.Items in square brackets are optional.
e.gn/NAME [t/TAG]can be used asn/John Doe t/friendor asn/John Doe.Items in square brackets and with
+after them can be used zero or more times.
e.g.[t/TAG]+can be used as(i.e. 0 times),t/friend,t/friend t/familyetc.Items in round brackets and with
+after them can be used one or more times.
e.g.(t/TAG)+can be used ast/friend,t/friend t/familyetc.|operator signifiesORrelationship.
e.g.n/NAME | r/MODULECODEmeansn/NAMEorr/MODULECODEParameters can be in any order.
e.g. if the command specifiesn/NAME p/PHONE_NUMBER,p/PHONE_NUMBER n/NAMEis also acceptable.Extraneous parameters for commands that do not take in parameters (such as
list,exitandclear) will be ignored.
e.g. if the command specifiesexit 123, it will be interpreted asexit.If you are using a PDF version of this document, be careful when copying and pasting commands that span multiple lines as space characters surrounding line-breaks may be omitted when copied over to the application.
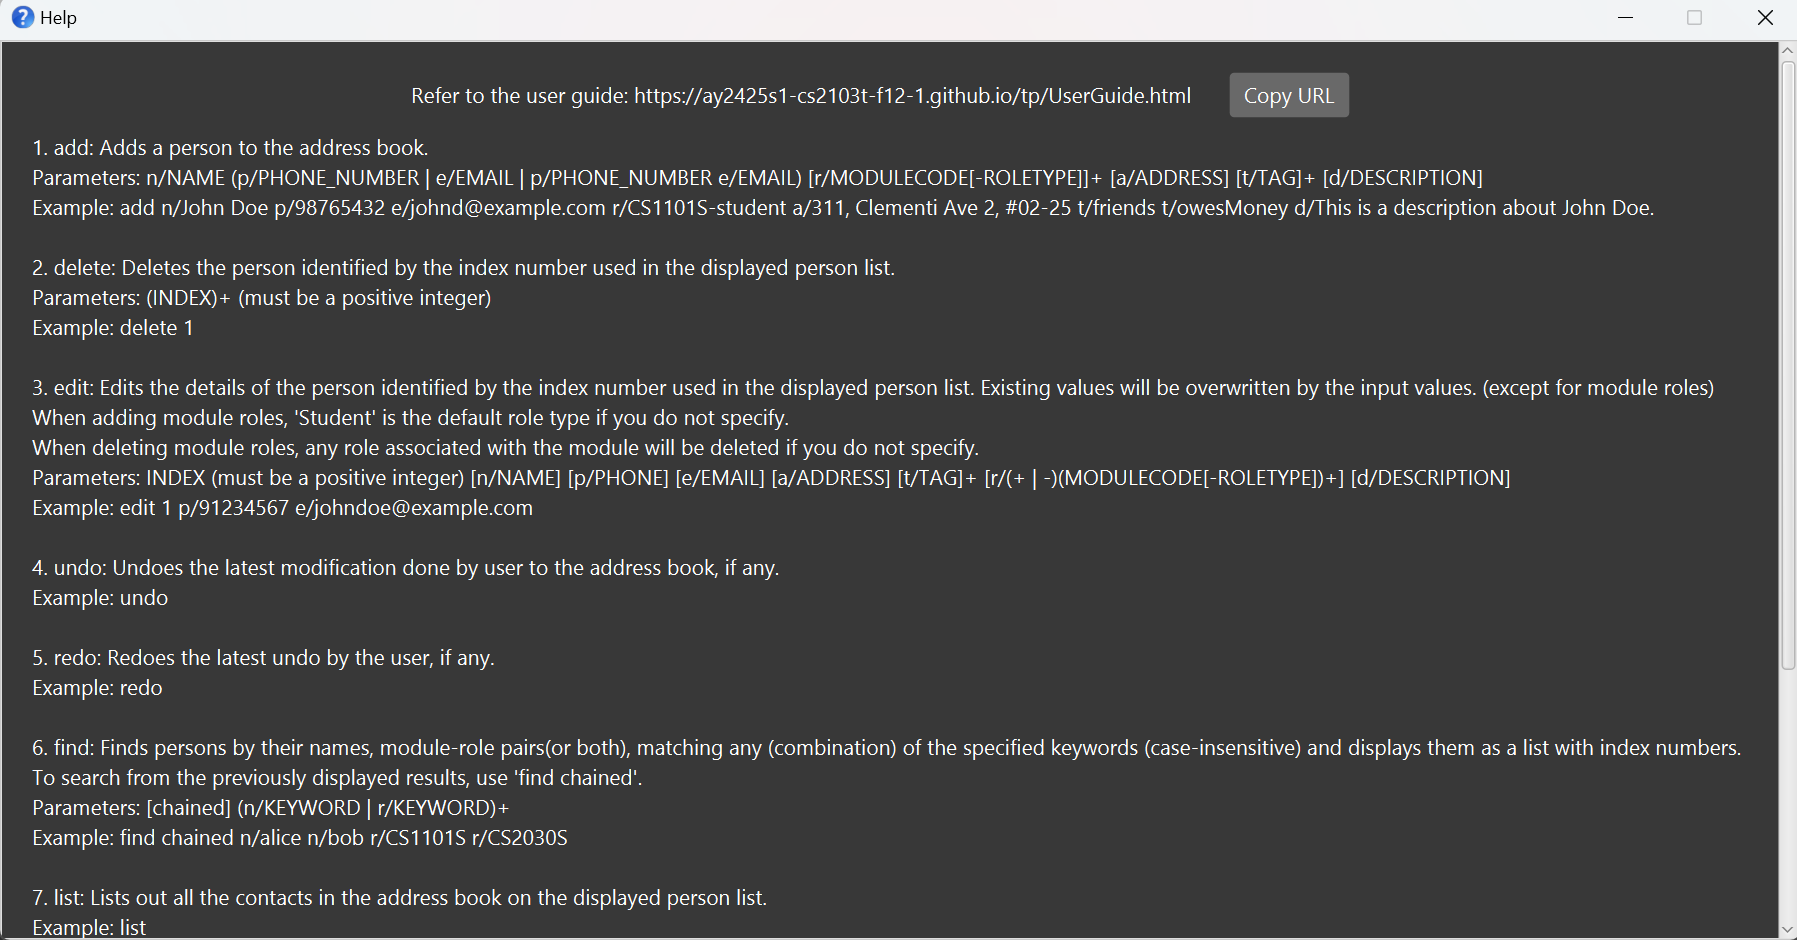
Viewing help: help
Help command supports two input formats which allows for more flexibility when you want to seek help:
Format: help [COMMAND_KEYWORD]
Shows a message explaining the usage of the specified command keyword
Example:
help addshows the help message foraddcommand in the following format
Format: help
Shows a message and a pop-up window showing the full list of help messages, and an external link to the full user guide.
Example:
Adding a person: add
Adds a person to the address book.
Format: add n/NAME (p/PHONE_NUMBER | e/EMAIL | p/PHONE_NUMBER e/EMAIL) [r/MODULECODE[-ROLETYPE]]+ [a/ADDRESS] [t/TAG]+ [d/DESCRIPTION]
NAMEcan take any values and can not be blank.PHONE_NUMBERis almost a free-form text field with minimal validation.MODULECODEshould be valid NUS module codes such as 'CS2040S' or 'MA1521'.ROLETYPEcan be one of the following:student,ta,tutor,prof,professor. It defaults tostudentif not specified.- The full
r/MODULECODE[-ROLETYPE]parameter means that the person has the role for this module (e.g.r/CS1101S-studentmeans that the person is a student of CS1101S). - If the same module is added multiple times, then it is assumed to be an error in user input, because a person should not have multiple roles at the same time (e.g.
r/CS1101S-student r/CS1101S-profis not allowed). - Note: A professor is not considered a teaching assistant (TA).
EMAILshould be a valid email address.ADDRESScan take any values and can not be blank.TAGcan take any alphanumeric values and can not be blank.DESCRIPTIONcan take any values but cannot exceed 500 characters.
For more explanation on the format and design of each input field, refer to the input format section.
Info: Duplicate Handling
- A person is considered a duplicate if another person in the address book has the same email address or phone number. The app will prevent adding contacts with duplicate emails or phone numbers.
- For the same reason, the app will prevent the user from changing the email address or phone number of a contact to one that is already in use by another contact.
Info: Input data containing prefixes
- Should any of the fields contain reserved prefixes (e.g.
add ... d/For a/b testingcontainsa/which is reserved), the message will be split into multiple fields. - To work around this, you can add a character in front of the reserved prefix (e.g.
add ... d/For 'a/b testing). - This issue will be fixed in a later version using a special delimiter to handle such cases.
Examples:
add n/John Doe p/98765432 e/johnd@example.com r/CS1101S.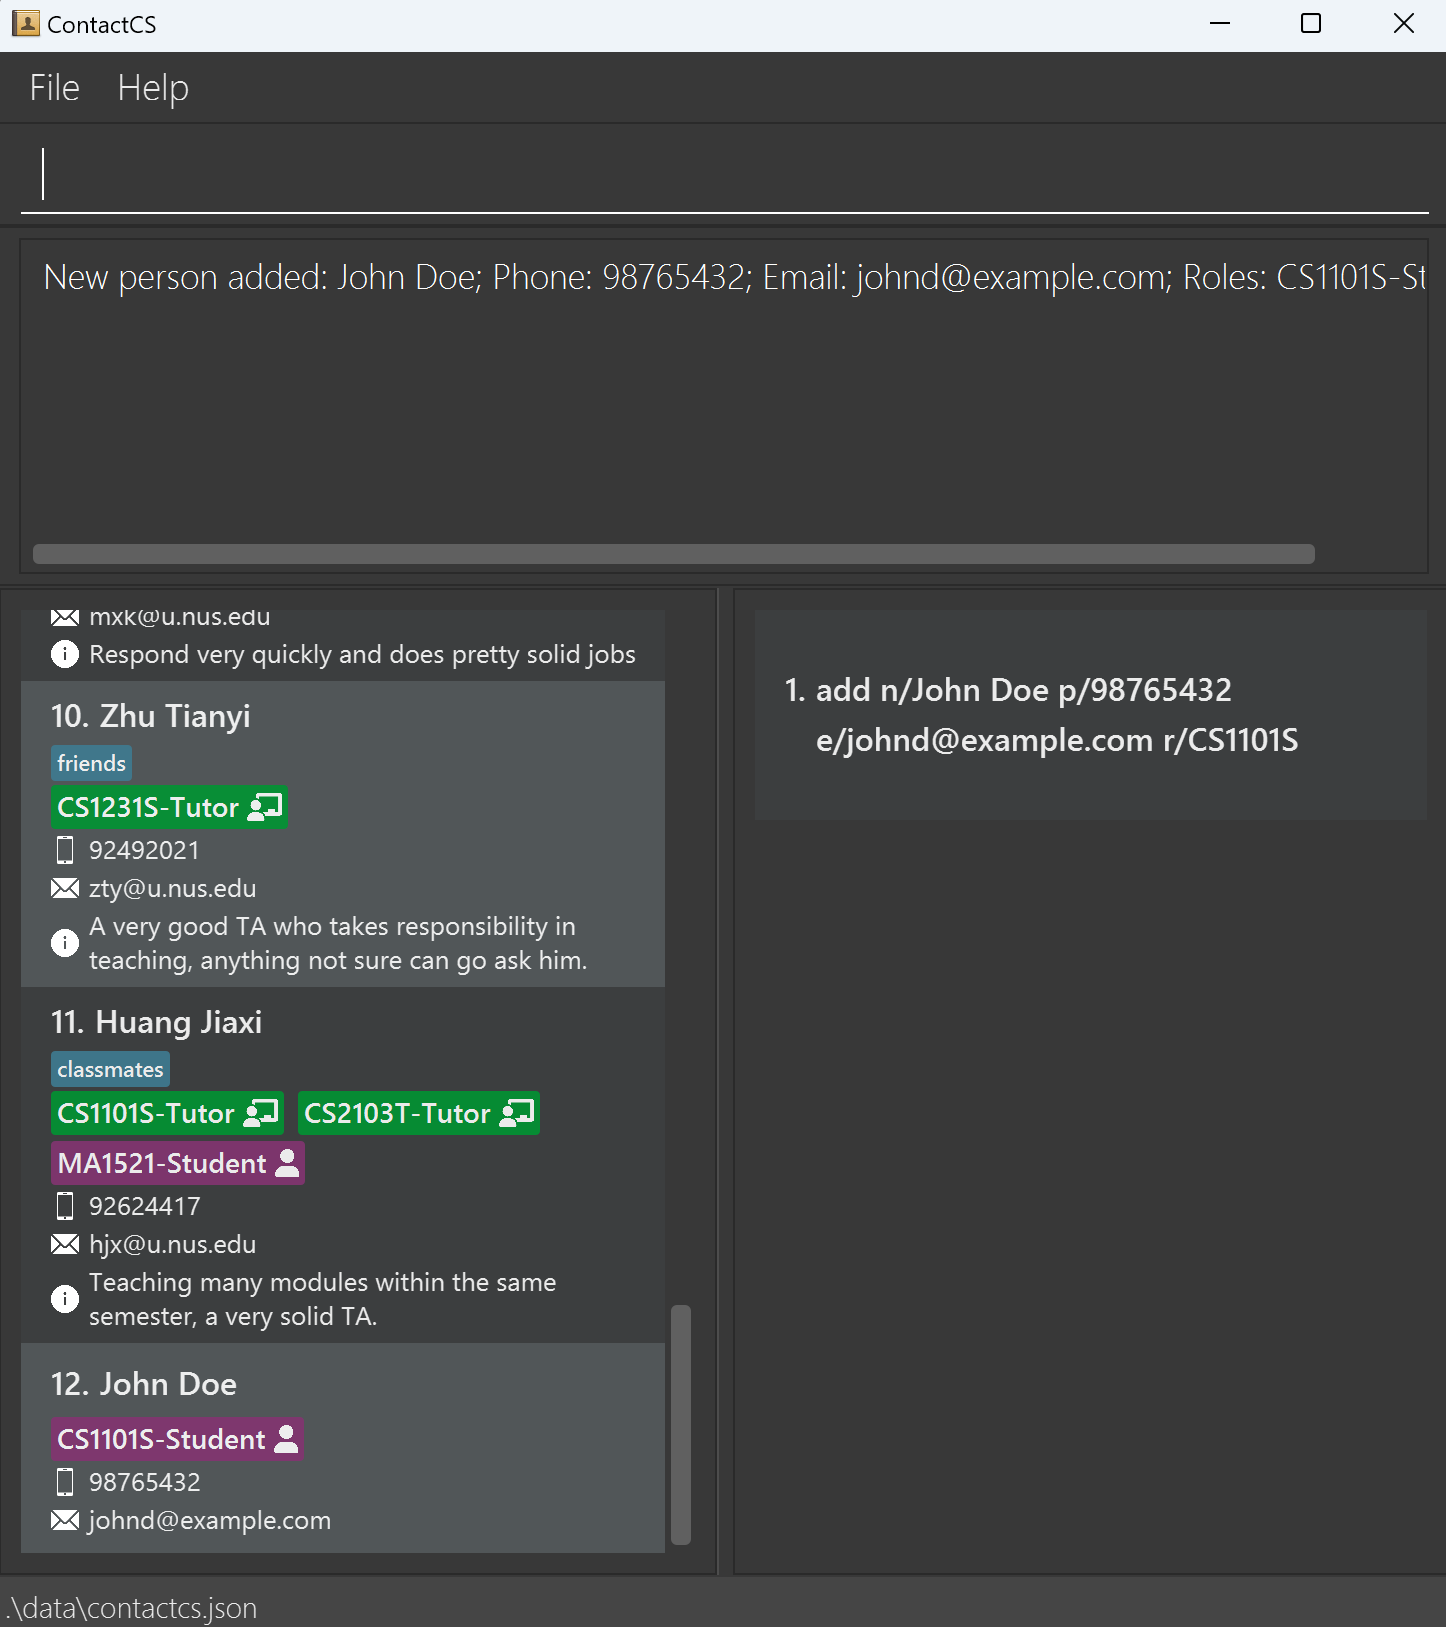
add n/Jane Doe p/81234567 e/janed@example.com r/CS1101S-TA r/CS2040S.
Listing all persons: list
Shows a list of all persons in the address book.
Format: list
Editing a person: edit
Edits an existing person in the address book.
Editing module-role
The module-role pairs can be edited by adding and deleting.
Adding new module-role pairs
Format: edit INDEX r/+(MODULECODE[-ROLETYPE])+
Please note that the first + should be typed as is while the second + is the multiplicity syntax explained here.
- Adds new roles to the person at the specified
INDEX. The index refers to the index number shown in the displayed person list. - The index must be a positive integer 1, 2, 3, …
- At least one module-role pair must be provided.
- Multiple module-role pairs can be added at once, separated by
" ". - The role type can be omitted, in which case the role
STUDENTwill be the default.
Examples:
edit 1 r/+CS2103T-Profadds role "professor of CS2103T" to the first person.edit 1 r/+CS1101S MA1521-TAadds role "Student of CS1101S" and "TA of MA1521" to the first person.
Caution: Common Mistakes
- If you are adding multiple module-role pairs, only the first pair should have a
+sign before the module-role pair. The subsequent pairs should not have a+sign before them. i.e.r/+CS1101S +MA1521-TAis unnecessary and will cause an error. - You only need to specify one
r/. i.e.r/+CS1101S r/+MA1521-TAis unnecessary and will cause an error.
Deleting existing module-role pairs
Format: edit INDEX r/-(MODULECODE[-ROLETYPE])+
- Deletes existing roles from the person at the specified
INDEX. The index refers to the index number shown in the displayed person list. - The index must be a positive integer 1, 2, 3, …
- At least one module-role pair must be provided.
- Multiple module-role pairs can be deleted at once, separated by
" ". - The role type can be omitted, in which case any associated role will be deleted.
i.e.
edit 1 r/-MA1521will deleteMA1521-Student,MA1521-TAorMA1521-Prof, whichever is present.
Examples:
edit 1 r/-CS2103Tdeletes any role related to moduleCS2103Tfrom the first person.edit 1 r/-CS1101S-Student MA1521-TAdeletes the role "Student of CS1101S" and "TA of MA1521" from the first person.
Caution:
- Omitting the role type leads to two different behaviors for adding and deleting roles:
- For adding roles, the role type will be
Studentby default. - For deleting roles, any role associated with the module code will be deleted, regardless of the role type.
- For adding roles, the role type will be
Editing all other fields
Except for the module-role pairs, all other fields can only be edited by complete replacement.
Format: edit INDEX [n/NAME] [p/PHONE] [e/EMAIL] [a/ADDRESS] [t/TAG]+ [d/DESCRIPTION]
- Edits the person at the specified
INDEX. The index refers to the index number shown in the displayed person list. The index must be a positive integer 1, 2, 3, … - At least one of the optional fields must be provided.
- Existing values will be updated to the input values.
- When editing tags, the existing tags of the person will be removed i.e adding of tags is not cumulative.
- You can remove all the person’s tags by typing
t/without specifying any tags after it. - Similarly, you can remove a person's description by typing
d/without specifying any description after it. - After editing, the app will go back to the main window and display the updated person list.
Examples:
edit 1 p/91234567 e/johndoe@example.comEdits the phone number and email address of the 1st person to be91234567andjohndoe@example.comrespectively.edit 2 n/Betsy Crower t/Edits the name of the 2nd person to beBetsy Crowerand clears all existing tags.
Locating persons: find
The find command allows you to locate persons by their names, module-role pairs, tags or any combinations of them.
Finding by name
Finds persons whose names contain any of the given keywords.
Format: find (n/KEYWORD)+
- The search is case-insensitive. e.g
hanswill matchHans - Each keyword can contain multiple words. e.g.
John Doe - Each keyword must exist contiguously in the name in order to match. e.g.
John Doewill not matchJohn David Doe - Only the name is searched.
- Partial words will be matched as well. e.g.
Hanwill matchHans - Persons whose names matching at least one keyword will be returned (i.e.
ORsearch). e.g.find n/Hans n/Bowill matchHans Gruber,Bo Yang
Examples:
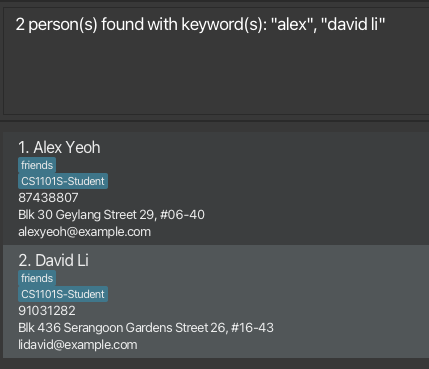
find n/JohnreturnsjohnandJohn Doefind n/alex n/david lireturnsAlex Yeoh,David Li
Finding by module-role
Finds persons whose module-role pairs contain any of the given keywords.
Format: find (r/KEYWORD)+
- Search by module code and optionally specify the role type (separated by a dash). For example,
CS2103T-Profwill search for the moduleCS2103Twith the roleProfessor. - The search is case-insensitive. e.g.
cs2103t-studentwill matchCS2103T-Student. - If the role type is not specified, role
STUDENTwill be assumed. For example,find r/CS2103Twill return all students takingCS2103T. - Persons whose module-role pairs matching at least one module-role keyword will be returned (i.e. OR search).
Examples:
find r/CS2103Treturns all students taking the moduleCS2103Tfind r/CS2103T-Prof r/CS1101Sreturns all persons with the role Prof in CS2103T or Student in CS1101S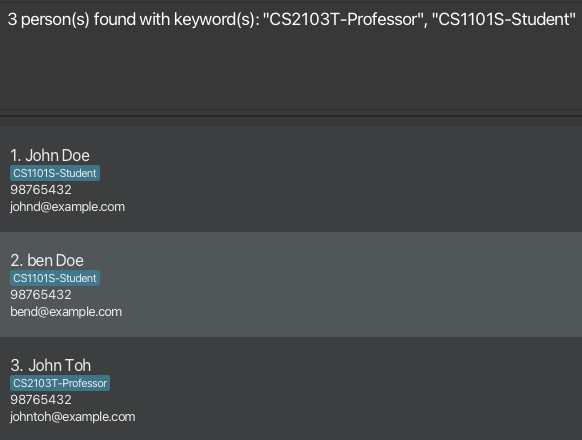
Finding by tag
Finds persons whose tags contain any of the given keywords.
Format: find (t/KEYWORD)+
- The search is case-insensitive. e.g
Friendswill matchfriends - Partial words will be matched as well. e.g.
classwill matchclassmates - Persons whose tags matching at least one tag keyword will be returned (i.e. OR search)
Examples:
find t/officereturns all contacts whose tags contain wordofficefind t/classmates t/friendsreturns all contacts whose tags contain eitherclassmatesorfriends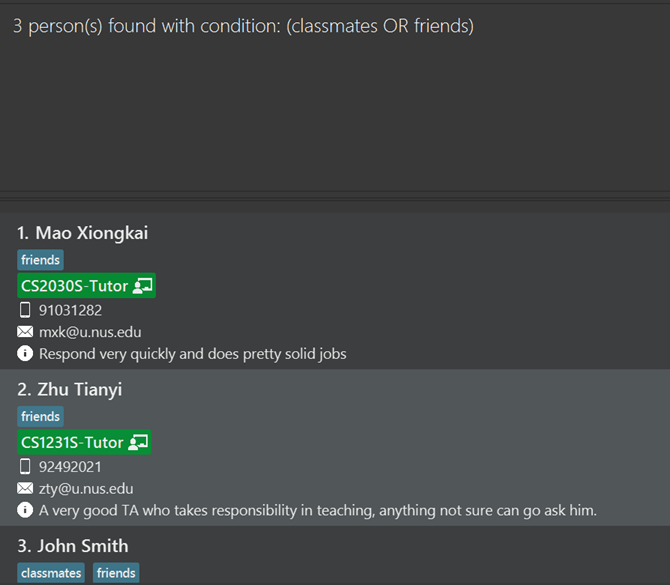
Finding by combinations of names, module-roles and/or tags
Finds persons whose names, module-role pairs and tags contain any combination of the given keywords.
Format: find [chained] (n/KEYWORD | r/KEYWORD | t/KEYWORD)+
Persons matching at least one name keyword (if provided) AND at least one module-role keyword (if provided) AND at least one tag keyword (if provided) will be returned.
If
chainedis specified, chained find will be used.
Chained Find
The Chained Find feature allows you to narrow down previous search results by applying additional filters,
making it easier to locate specific entries that meet multiple criteria.
How to Use Chained Find
Start with an Initial Search:
- Begin by using the find command with your first search criterion.
Apply Additional Filters with find chained:
- Use the find chained command immediately after the initial search to further filter the displayed results based on new criteria.
Example
- Step 1: type
find n/Johnand hit enter. You will see all entries with "John" in their names; - Step 2: type
find chained n/Doeand hit enter. This time you will see only the entries that contain both "John" and "Doe" in their names.
Example:
find n/Martin n/Boyd r/cs1101s-prof r/cs1231s-prof t/favoritereturn all persons whose name are eitherMartinorBoyd, and assumes eitherCS1101S ProfessororCS1231S Professor, and has the tagfavorite.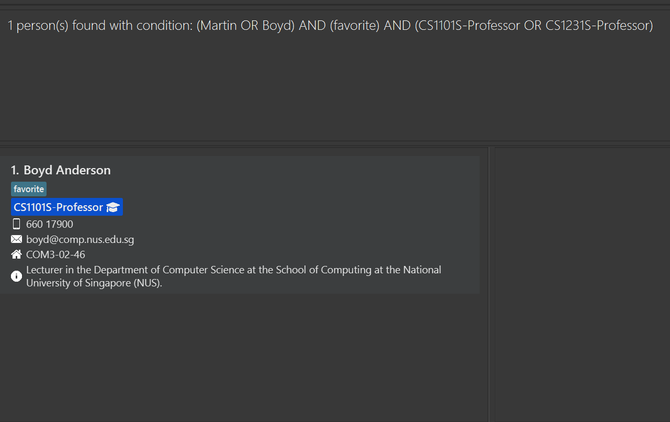
Deleting persons: delete
Deletes the specified person from the address book.
Format: delete (INDEX)+
- Deletes the person(s) at the specified INDEX(es).
- The index refers to the index number shown in the displayed person list.
- The indices must be a positive integer 1, 2, 3, …
Examples:
listfollowed bydelete 1 2 3deletes the 1st, 2nd and 3rd person in the address book.find n/Betsyfollowed bydelete 1deletes the 1st person in the results of thefindcommand.
Clearing all entries: clear
Clears all contacts from the address book.
Format: clear
Undoing latest change to contact data: undo
Undoes the effect done by the latest data-modifying command, if any.
Format: undo
- Data-modifying commands refers to those who has direct manipulation over the contact data, such as add, edit, delete or clear.
- Commands that do not modify contact data in the address book(list, help, find etc.) are not considered by the undo command.
- If you input
undowhen there's nothing to undo, GUI will remind you about this and no effect would be applied to the address book.
Examples:
- If you accidentally delete a contact using the
deletecommand, you can revert this change by inputundocommand.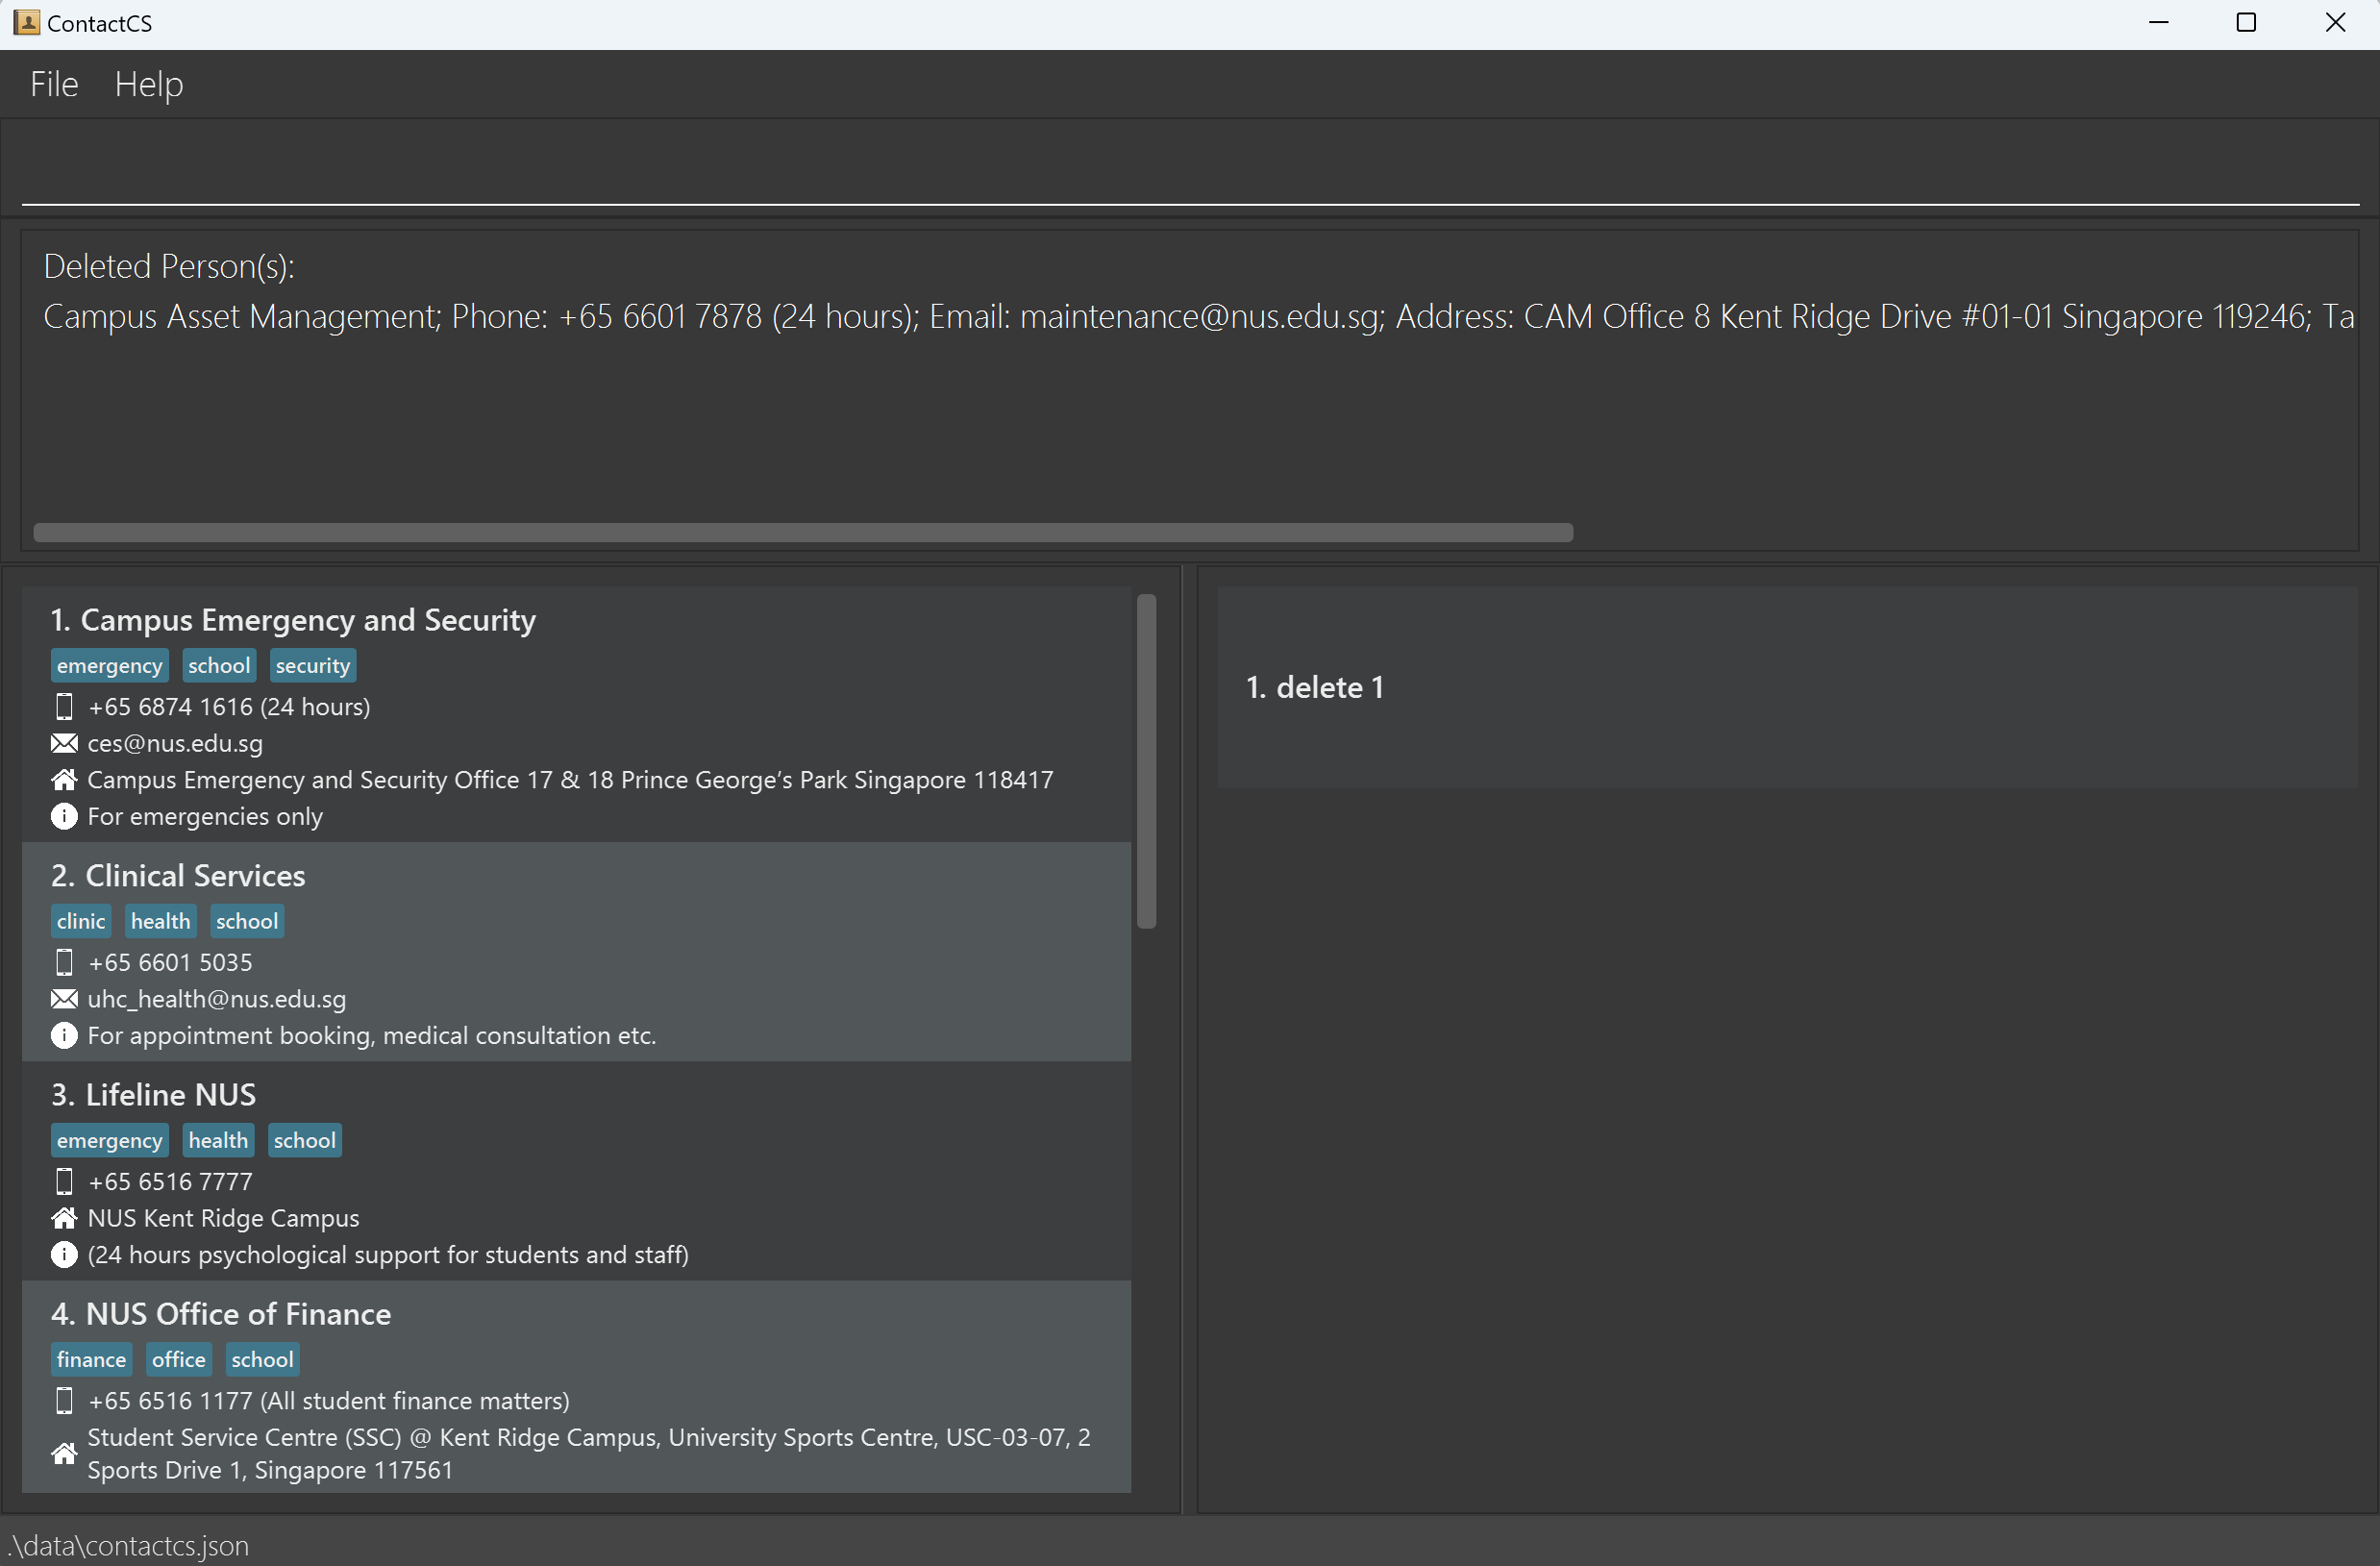
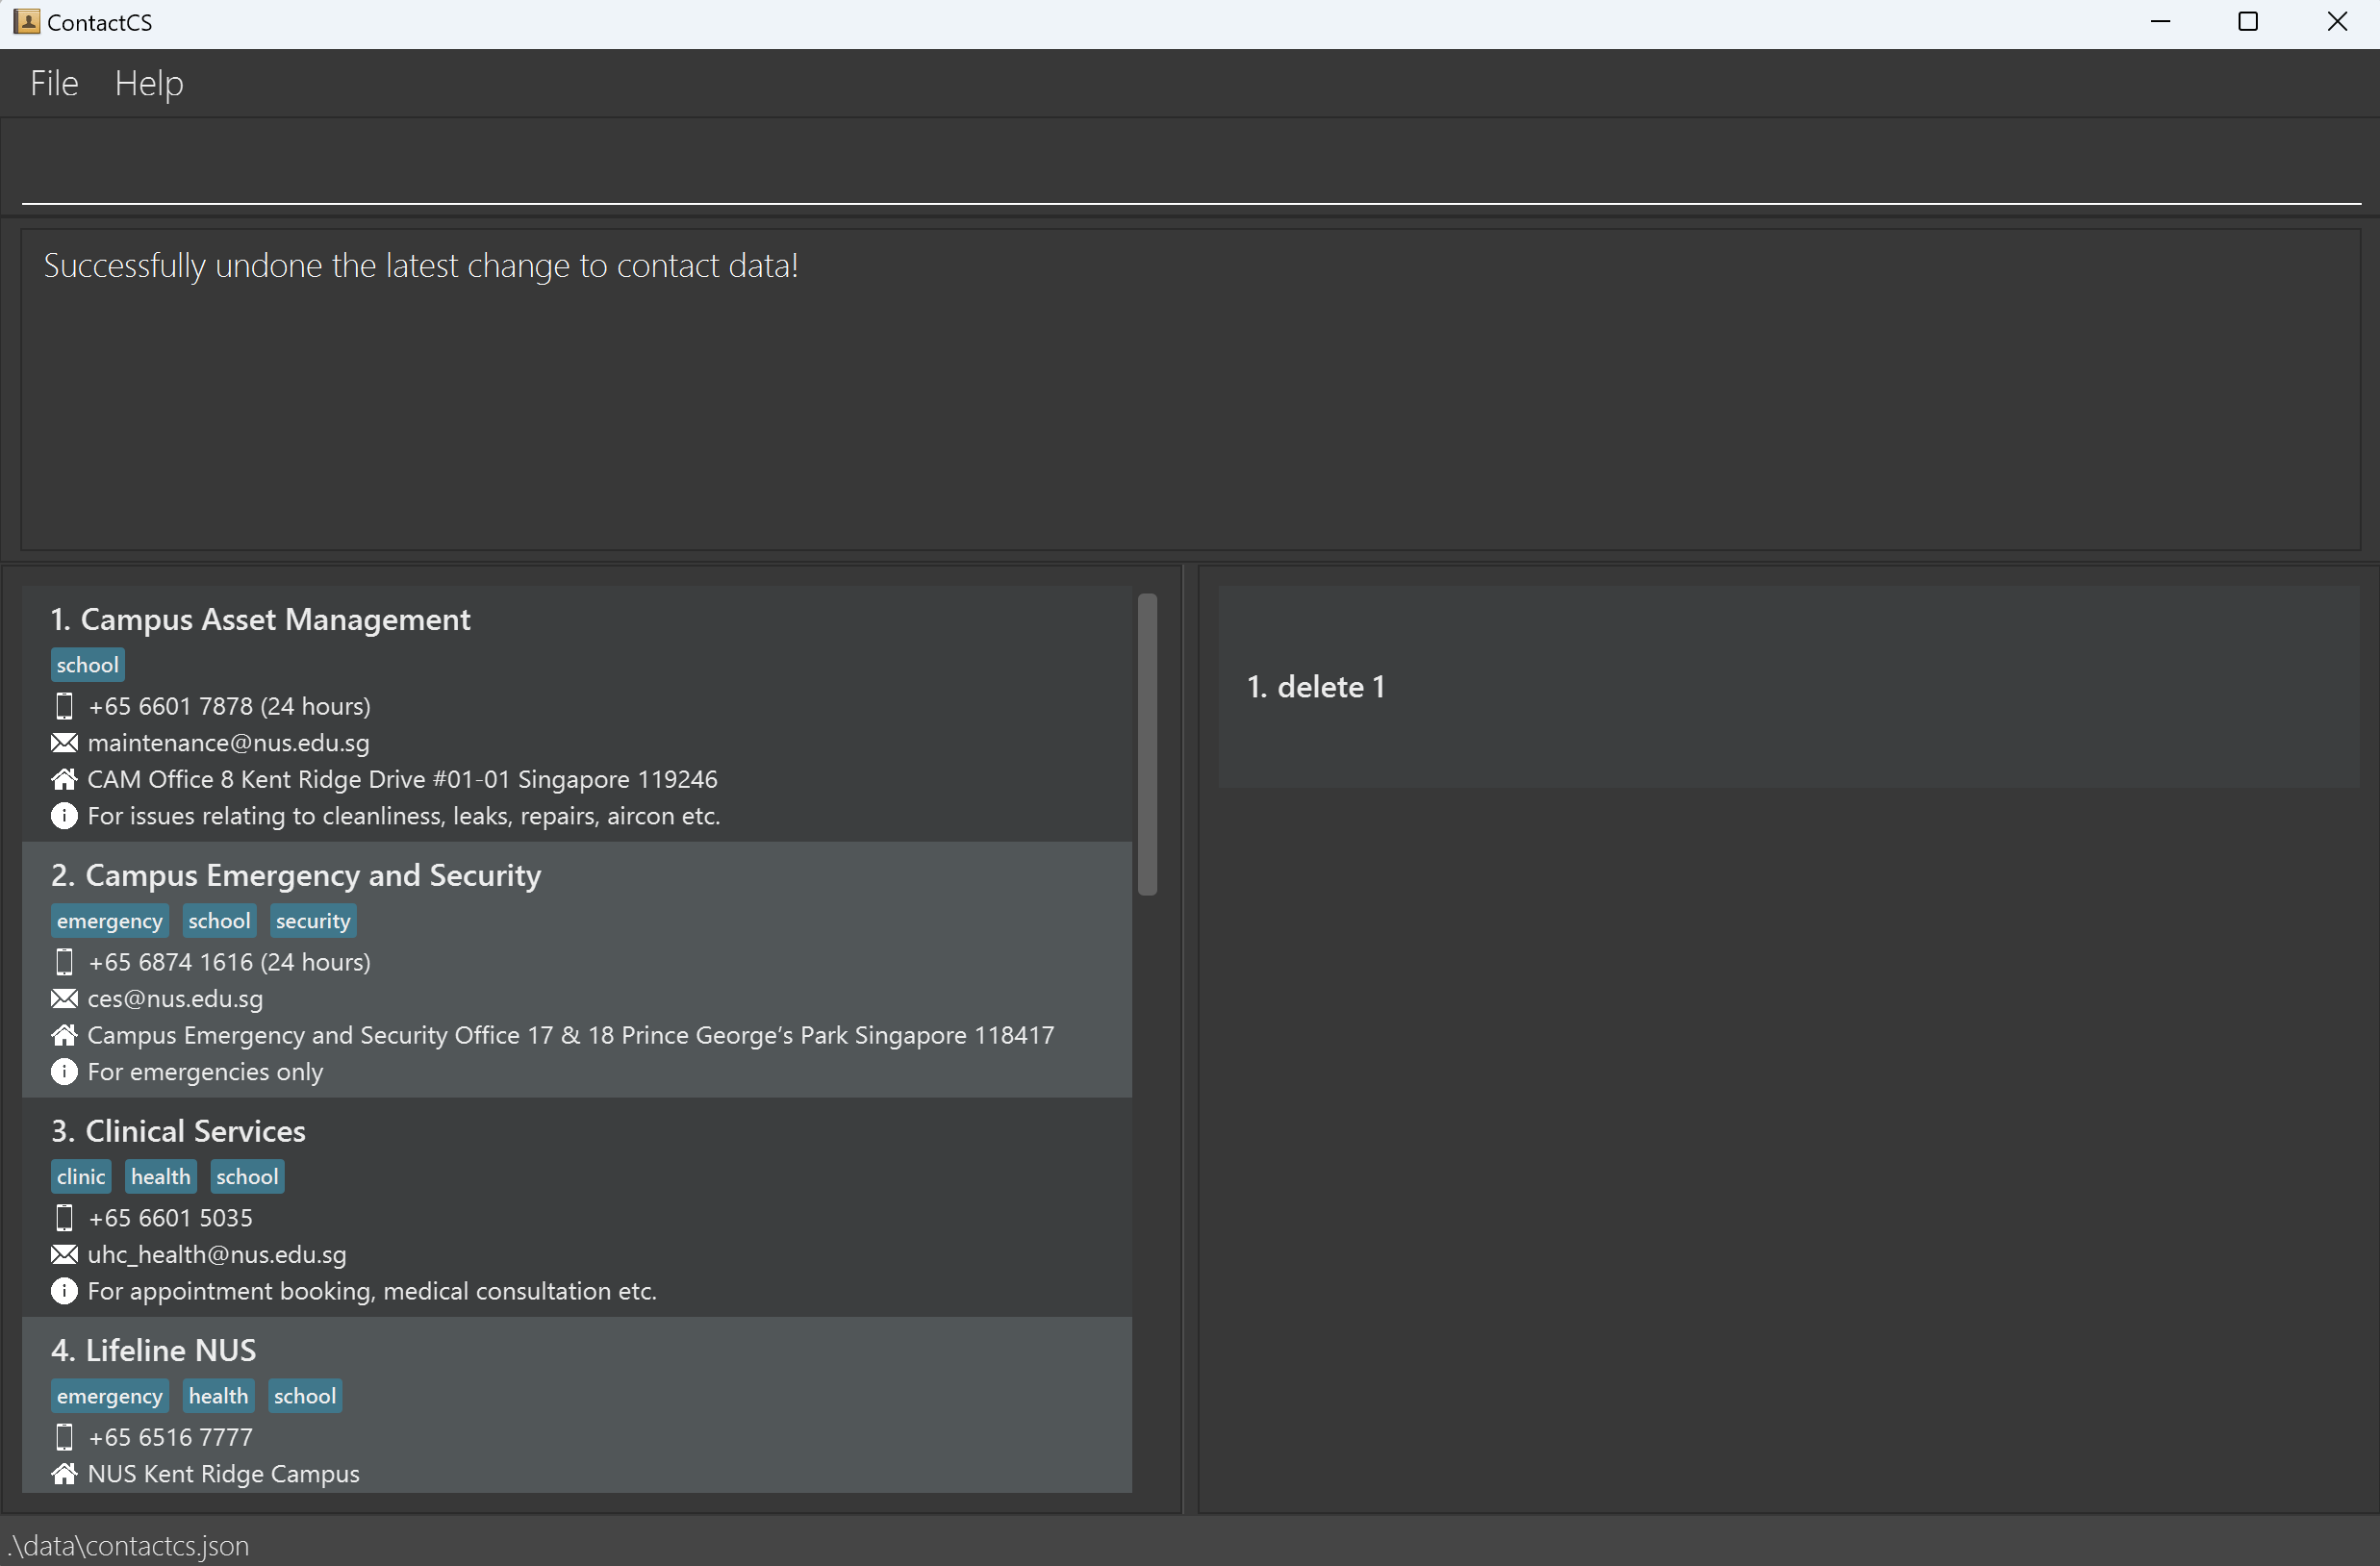
- Similarly, if you accidentally clear the whole address book using the
clearcommand, you can restore the whole address book usingundocommand as well. - Wrong adding/editing of contact info can be reverted by inputting
undoas well.
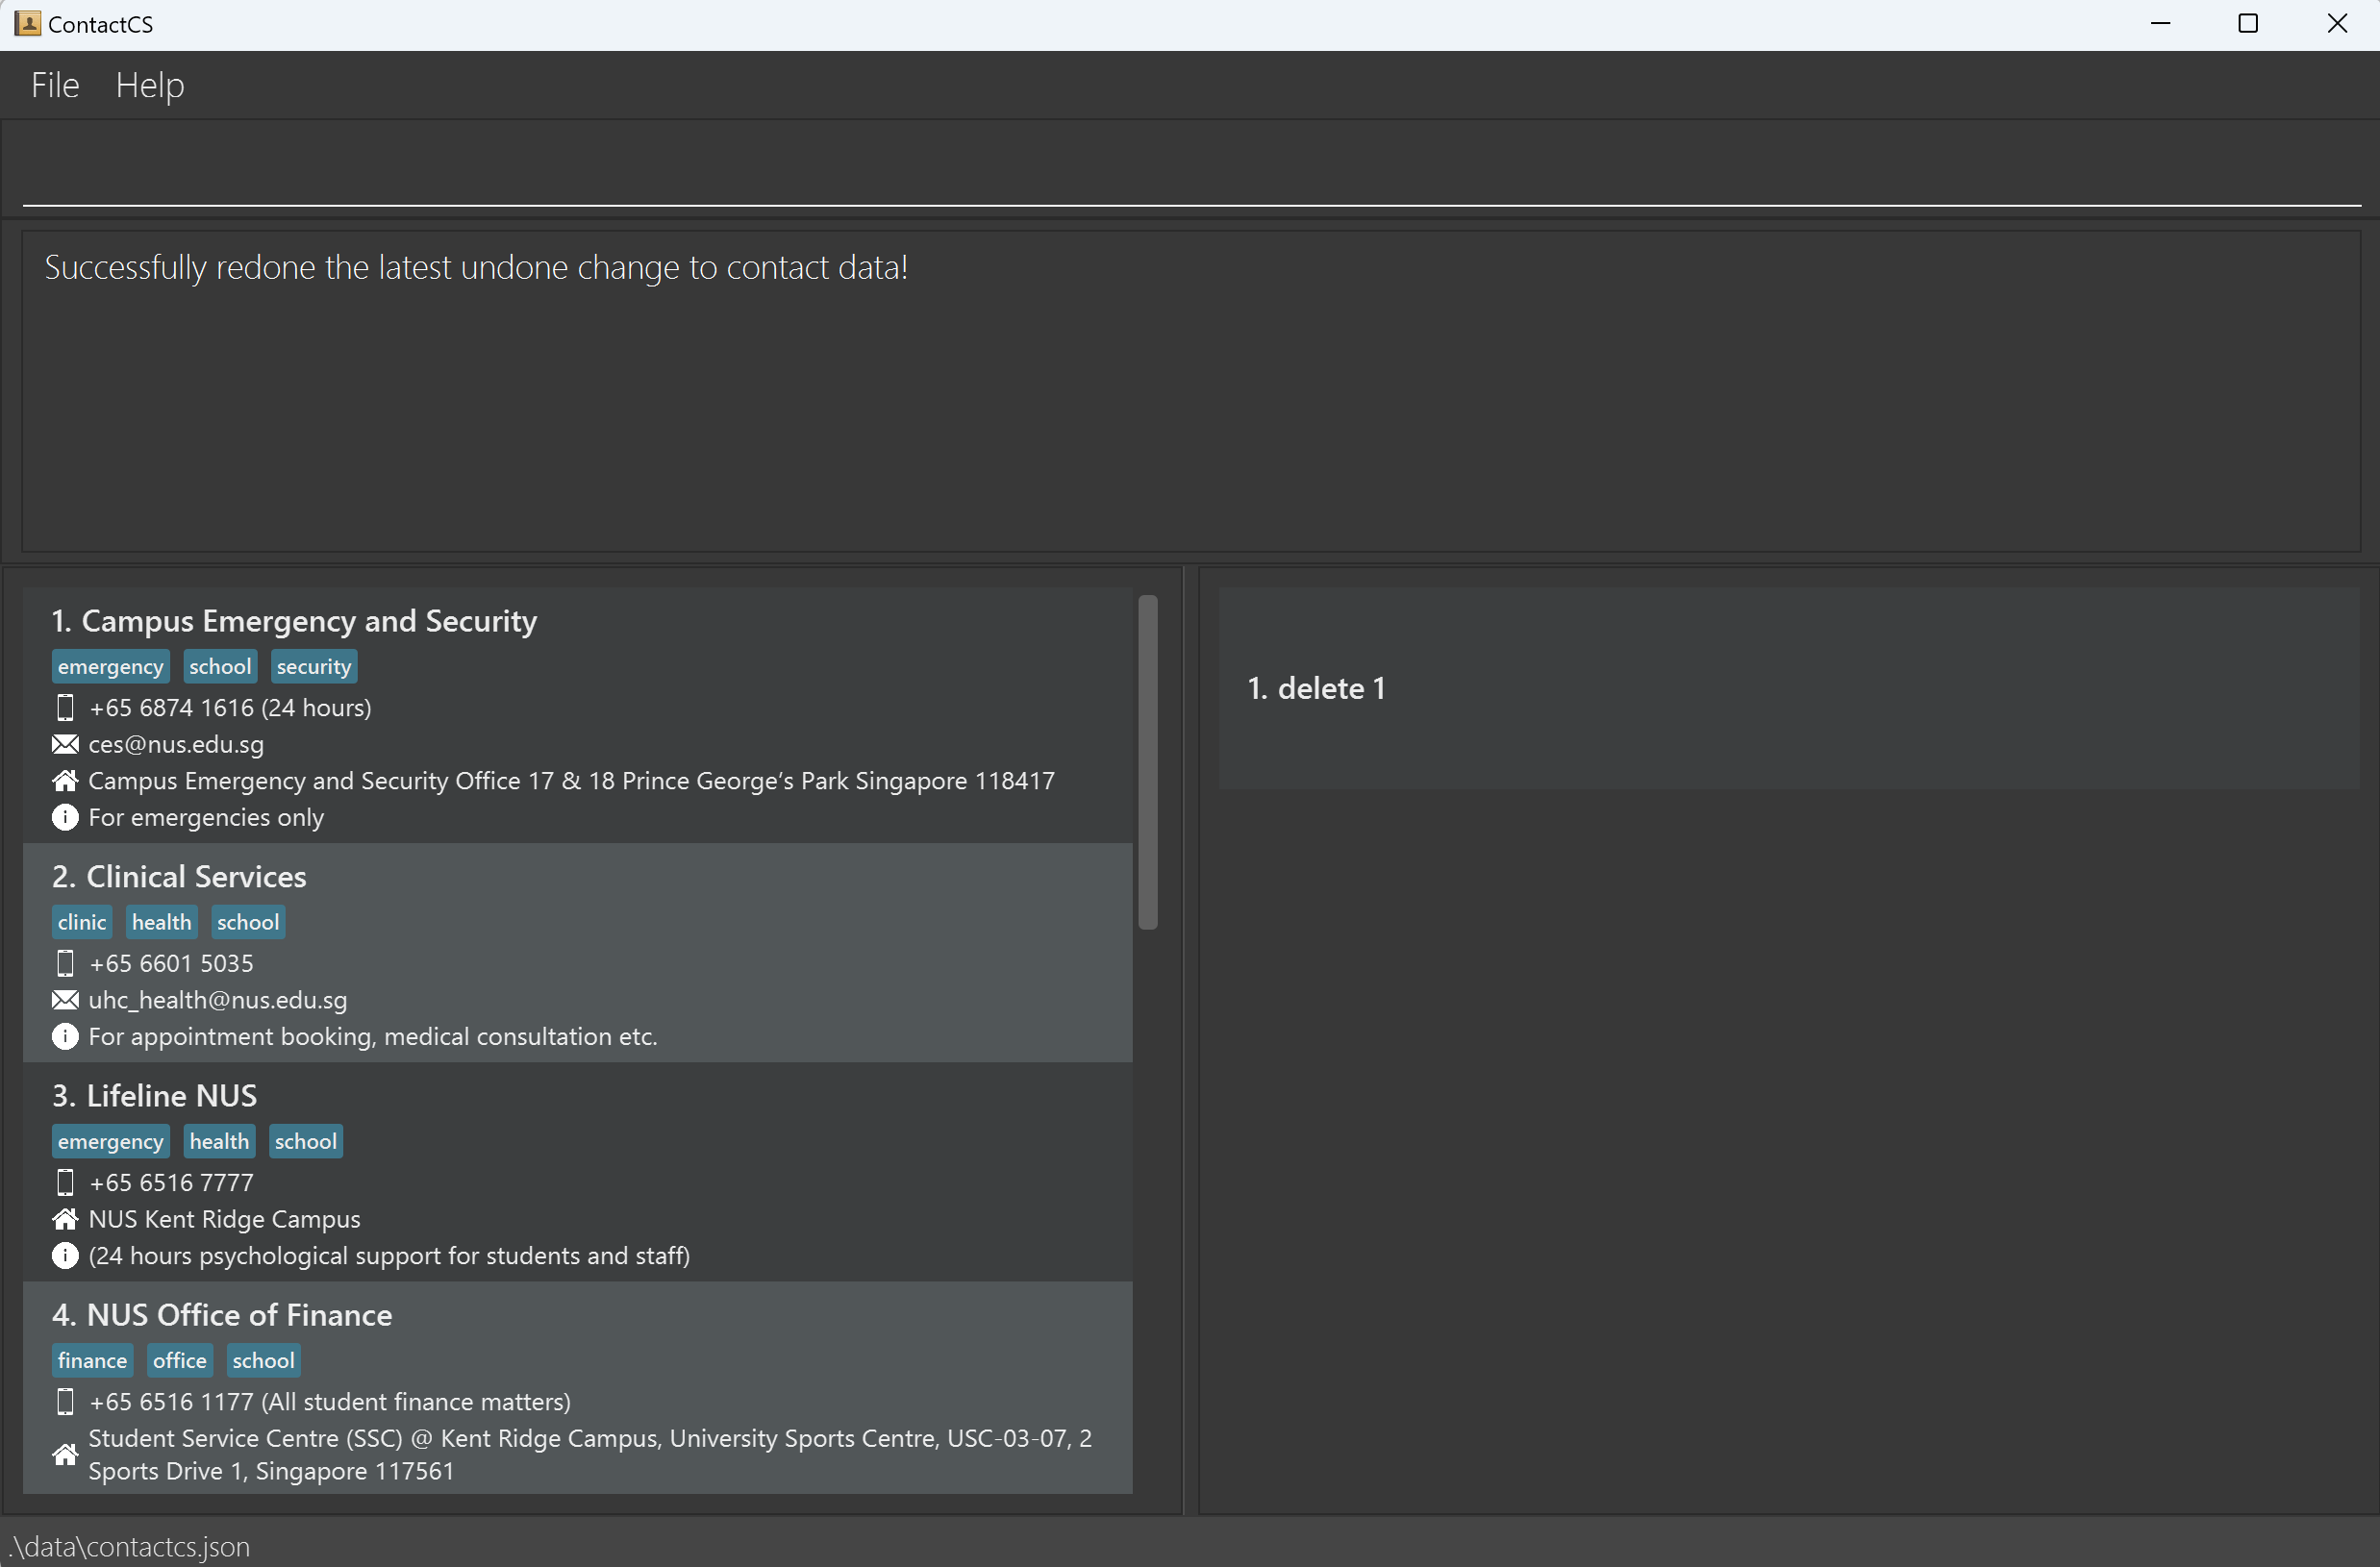
Redoing latest undone change to contact data: redo
Redoes the latest undone modification on contact data, if any.
Format: redo
- Redo only helps to restore command results that can be handled by undo command, such as add, edit, delete and clear.
- If you input
redowhen there's nothing to redo, GUI will remind you about this and no effect would be applied to the address book.
Examples:
- If you undo a change to the contact data, but end up thinking that it may be
better to keep it, you can input
redoafter undo the change to restore it back. - Taking the same example from the undo session:
Exiting the program: exit
Exits the program.
Format: exit
Saving the data
ContactCS data are saved in the hard disk automatically after any command that changes the data. There is no need to save manually.
Editing the data file
ContactCS data are saved automatically as a JSON file [JAR file location]/data/contactcs.json. Advanced users are welcome to update data directly by editing that data file.
Caution:
If your changes to the data file makes its format invalid, ContactCS will discard all data and start with an empty data file at the next run. Hence, it is recommended to take a backup of the file before editing it.
Furthermore, certain edits can cause the ContactCS to behave in unexpected ways (e.g., if a value entered is outside the acceptable range). Therefore, edit the data file only if you are confident that you can update it correctly.
Archiving data files [coming in v2.0]
Details coming soon ...
Input format
NAME field
In our application, we understand that everyone's names can have various characters and symbols, thus we decided that as long as it is not a blank string, it is considered acceptable.
PHONE_NUMBER field
The PHONE_NUMBER field (specified in the add or edit commands) is defined as a string where, if split by spaces, at least one of the resulting tokens is a valid phone number.
Definition of a valid phone number
In our application, the concept of a valid phone number is defined as:
- a string without any whitespace, and
- with at least 2 digits, and
- without any alphabet characters, and
- may contain additional special characters such as but not limited to "+", "-", "(", and ")".
Some valid phone numbers include +6581234567, 81234567, or +44-1234567.
Some invalid phone numbers include +6 5 8 1 2 3 4 5 6 7, or 8123p4567.
Some valid PHONE_NUMBER values include 81234567, 81234567 (handphone), or 81234567 (office 1) 91234567 (office 2).
Since a contact may have different phone numbers at the same time, such as mobile, office, home etc, and any length of annotation to differentiate between them,
we decide not to enforce any input length restriction on this field, to offer you more flexibility when taking down and annotating phone numbers of a contact.
Caution: To allow more flexibility in the input format, we have to sacrifice some validation checks. As such, it is important to ensure that the phone number you input is correct.
EMAIL field
The EMAIL field accepts any string that is a valid email address.
Note that the email address does not need to contain a period(.) to be considered valid. For example, example@domain is considered valid.
MODULE_ROLE field
The MODULE_ROLE field represents the role of a contact, such as CS1101S Student, CS1231S Tutor or MA1522 Professor and so on.
It consists of two sub-fields: MODULECODE and ROLETYPE.
MODULECODE field
The MODULECODE field refers to the module codes of modules in NUS, and is defined as at least one letter followed by at least one number
and lastly ended by an optional sequence of letters.
This field is case-insensitive.
Some valid module code inputs include CS1231S, CS1231, CFG2002MY and DMA1201CH.
Take note that even though the modules that can be taken by NUS Y1 CS Students are quite limited, we recognize that they may take on double majors/minors, or courses from DYOC (Design Your Own Course) Scheme, hence we do not enforce strict validation to check whether the provided module code represents a valid NUS CS module and only checks on its basic format. Since some courses (e.g. DYOC, Global Industry Insights) may have potentially longer module code, we do not enforce input length restriction either. The onus is on you to ensure that the module code provided is a real module code in NUS.
ROLETYPE field
The ROLETYPE field refers to the role assumed by a person in a module, and currently can be any of student, professor or tutor.
This field is case-insensitive.
Acronyms can be used for easier input:
- "TA" is equivalent to "Tutor"
- "prof" is equivalent to "Professor"
Take note that each role type only represents a single role, and you should define the role type of a person based on the most accurate description of this person's role. For example, if a professor is also the tutor of the course, it is better to specify the role of this contact as the professor of this course instead of tutor. Similarly, even though it is unlikely for a contact to be a professor and a student at the same time, we do not enforce strict validation on this to give you more flexibility in annotating your contact and avoid potential input issues in rare scenario due to overzealous validation.
ADDRESS field
The ADDRESS field can be used to refer to the address of any location related to a contact, such as home, office, consultation venue etc.
Since the length of address input may differ drastically because of the nature of the location and the complexity in its address name structure, we do not enforce restriction on the input length and as long as the input is not blank, it is considered as a valid address.
Some valid ADDRESS values include COM3-01-20, #05-03, Blk 211, Any Place Street 123, Singapore 123456, Utown Residence #12-34 etc.
TAG field
The TAG field allows you to group contacts. you can later use the find by tag feature to query them more easily.
For more detail on find by tag feature, refer to find contacts by tag section.
Examples of TAG values include friends, office and classmates.
DESCRIPTION field
The DESCRIPTION field aims to provide you a simple way to annotate a contact with some basic information for easy reference in the future.
For example, you can use it to record down how you feel about a professor's way of teaching, or remember the important birthday of a friend in NUS SOC or even zoom link of a lecture/tutorial session taught by a professor/tutor.As you can see, we try to provide as much flexibility to you as possible to allow you to record any short pieces of information about the contact, but we also want it to be short. Hence, we restrict the input size of the description to be 500 characters which should be enough for most users.
FAQ
Q: How do I transfer my data to another computer?
A: Install the app in the other computer and overwrite the empty data file it creates with the file that contains the data of your previous ContactCS home folder.
Known issues
- When using multiple screens, if you move the application to a secondary screen, and later switch to using only the primary screen, the GUI will open off-screen. The remedy is to delete the
preferences.jsonfile created by the application before running the application again. - If you minimize the Help Window and then run the
helpcommand (or use theHelpmenu, or the keyboard shortcutF1) again, the original Help Window will remain minimized, and no new Help Window will appear. The remedy is to manually restore the minimized Help Window. - There is an unused space below the command history box.
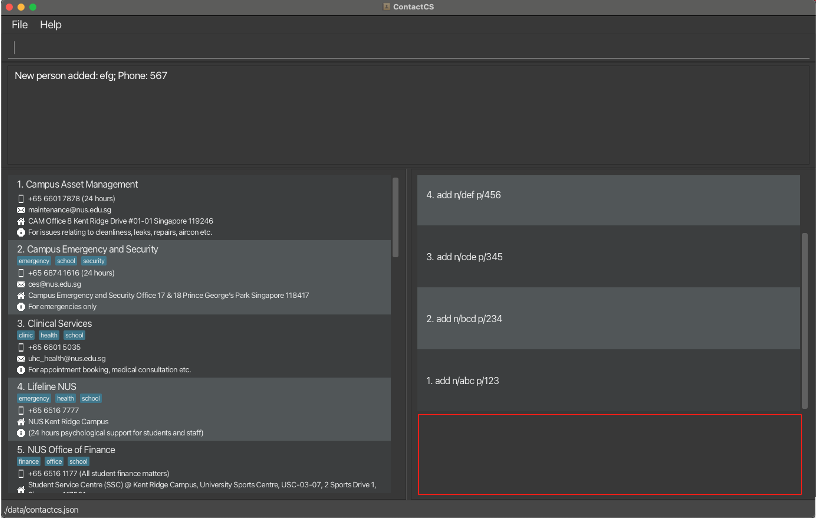
As shown in the screenshot above, marked by the red box.
Command summary
| Action | Format, Examples |
|---|---|
| Add | add n/NAME (p/PHONE_NUMBER | e/EMAIL | p/PHONE_NUMBER e/EMAIL) [r/MODULECODE[-ROLETYPE]]+ [a/ADDRESS] [t/TAG]+ [d/DESCRIPTION] e.g., add n/James Ho p/22224444 e/jamesho@example.com r/CS1101S a/123, Clementi Rd, 1234665 t/friend t/colleague d/A good guy |
| Clear | clear |
| Delete | delete (INDEX)+e.g., delete 3 or delete 1 3 5 |
| Edit | edit INDEX [n/NAME] [p/PHONE_NUMBER] [e/EMAIL] [a/ADDRESS] [t/TAG]+ [r/(+|-)(MODULECODE[-ROLETYPE])+] [d/DESCRIPTION]e.g., edit 2 n/James Lee e/jameslee@example.com r/+CS2030S CS1101S-TA |
| Find | find [chained] (n/KEYWORD | r/KEYWORD | t/KEYWORD)+e.g., find chained n/James n/Jake r/CS1101S r/MA1521 t/friends t/classmates |
| Undo | undo |
| Redo | redo |
| List | list |
| Help | help [COMMAND_KEYWORD]e.g., help add or help |
| Exit | exit |